Showing posts with label Crafts. Show all posts

Monday, November 22, 2010

INSPIRED!

I feel like i haven't made anything craft wise in FOREVER! After summer travels, morning sickness and now the fact that we are moving I really have zero time. I even had grand ideas of making all my Christmas cards by hand this year...yeah...doubt that will be happening!

But I did find some inspiration today for other projects. Wrapped in a heated blanket drinking some spiced cider this morning I opened my google reader and started browsing. Here are a few tutorials I think are simply amazing and I really hope I can find time to make these!

#1. One Time Use Soap Leaves 
These are so adorable and what a great gift idea! I have so many of these leaves lying around I could make them today! Ohh and I can't wait to see what I can find for a Christmas version...maybe snowflakes?  So fun!
Click {HERE} to view the complete tutorial!


#2. Homemade Christmas Crackers
Christmas crackers have always been a big tradition in my family and I quickly emailed this tutorial to my mom, step mom and sister! I don't think I'll ever buy these again!
Click {HERE} to see the complete tutorial.


#3. DIY Big Box Advent Calendar
Holy freaken awesomness! (really there are no other words!) This may be a bigger project than I can handle this Christmas but eventually I would love to make one for each boy! Hmm....if I made Asher's next year and baby boy #2's the year after then I'd have a good variety of matching paper sets...ok now I'm just rambling! Eek, I'm so excited I just love it!
Click {HERE} to see the complete tutorial!

Tuesday, June 15, 2010

Tutorial Tuesday: Handmade Birthday Gifts

So technically not a tutorial today but I wanted to share the beautiful handmade birthday gifts I received Sunday and hopefully give you some inspiration for future gift giving! I know I'm inspired!


Mason Jar Potted Flowers & Matching Card
My friend Breanne is my Goodwill partner in crime and knows I always head strait to the glass section in search for Mason & other old fashioned jars! I just loved how she incorporated my love of jars into this beautiful gift and I love the simple matching card, it's beautiful!

Gorgeous Paper Keepsake Box
My friend Alyeska & family came for a photoshoot Saturday and surprised me with this gorgeous paper box. I simply must learn how to make this, it's absolutely stunning! The quote made me tear up, it's so special!

Engraved Burlap Wall Hanging
Ashley from {Cute as a Fox} gave me this amazing wall hanging! She actually engraved the burlap with her laser! Incredible! I can't wait to hang it up! Check out {her post} for more info on how she made it!

Sister's Cross Stitch Magnet
My little sis made me this beautiful cross stitch and mounted it in a magnet frame! It looks so good on my fridge and I love seeing it multiple times throughout the day. I forgot to ask about this one but she does most of her cross stitch with out a pattern it's amazing! She even made custom labels for our Christmas stockings this last year!

Beautiful Embossed Card
My bestie Claire gave me the most beautiful earrings this year along with a beautiful handmade card of course! She seriously is incredible with card making and is totally my inspiration!

Adorable Crochet Flowers
I had used one of Claire's crochet flowers while card making on our Montana trip and when my mom saw it she said, "I could totally make those!" Well since my birthday was right around the corner I asked her to do just that! For my 27th birthday I received (among a ton of other craft supplies!) 27 crocheted flowers! All different sizes and colors all equip with brads ready to be attached to cards!  Check out {this post} to see a few cards I've already made with them!

Thank you to all my friends and family for the wonderful and generous gifts, handmade and otherwise! I was thoroughly spoiled and had a wonderful birthday! 

Saturday, June 12, 2010

See It Again Saturday: Crochet Flowers & Card Marking

If you missed the Field Trip to AntKnit yesterday here's what you missed:
 
Crochet Flowers & Card Making

Today I wanted to show you some adorable flowers my mom made me recently for card making! The center are brads which make attaching to cards easy peasy!
 Aren't they adorable!
-
Here are a few examples of cards I've made using them!

The stems and leaves I just hand stitched with a little embroidery floss!

Saturday, June 5, 2010

See It Again Saturday: Custom Tile/Vinyl Checker Board

 Incase you missed the field trip to A Little Tipsy here it is again!

Father's Day
Custom Checkers Board 
 I wanted to come up with a personalized gift for my Dad for Father's Day this year. Promptly upon my moving out they remodeled the basement into a Bar for get togethers and parties. They call it Bowd's Bar (Last name Bowden) and they love it! I had been thinking about using tile and vinyl to make a checkers board for a while and though, "This is the perfect opportunity!"

What you need:
16x16 Piece of Tile
15x15 Vinyl Checkerboard Pattern
24 Wooden Circles
Scrapbook Paper
Mod Podge & Foam Brush
Circle Punch
Felt & Hot Glue

Step One:
Adhere your vinyl to the tile. Luckily tile is a forgiving surface so when I laid it crooked the first time I was able to carefully peel it back up and try again! Whew! I get my vinyl from Marni at{Choose the Writing}!

Step Two:
Measure, cut and hot glue felt to the bottom of the tile. Do a little bit at a time since the glue drys fast.

Step Three:
I printed words onto scrapbook paper to customize, but plain scrapbook paper would work great too!
Step Four:

Grab your circle punch and start punching!

Step Five:
Mod Podge your circles of scrapbook paper to the wooden circles one side at a time. When I finished all 24 circles the first one was dry and ready for me to start again on the other side.

Step Six:
When I was done the 2nd side the 1st side was dry and I could apply more Mod Podge to the top to seal...and so on.

Step Seven:
Allow to dry completely! I used a crown graphic from {The Graphics Fairy} on one side for the "King Me!"

Now you're ready to Play!
Too see this weeks other Father's Day DIY Gifts Click {HERE}

Tuesday, June 1, 2010

Tutorial Tuesday: Father's Day Key Chain

Tutorial Tuesday
Father's Day Key Chain
Alright, it's day two of my great  crazy idea to do Father's Day Week and post a new DIY Father's Day gift idea each day! The good news though....I LOVE how this turned out and can't wait to give it to the hubs!

Here's what you need:
Wooden Tag
Picture
Scrapbook Paper
Mod Podge & Foam Brush
Key Ring
Ink Distress Pad & Sand Paper
 Leather Lace & Thread (Optional)

Step One:
Print your desired text onto your scrapbook paper. I used The Proclamation of the Family and formatted my text to print over my desired paragraph. (This took a few attempts to get it perfect, I'm not gonna lie!)

Step Two:
Trace and cut out the tag shape& hole from your photo and paper

Step Three & Four:
Ink distress and sand the edges of your paper. I choose not to ink distress my picture and only sanded the very edges so I would not scratch the photo. Apply a thin layer of Mod Podge to your paper and then place onto wooden tag.
 Crap...Oh Wait I Like That Moment:
While lightly rubbing the paper to make sure there were no bubbles a bit of the ink from my words rubbed off. I had a momentary freak out then realized I really like how it was "roughing up" the words...so I rubbed a little more! Seal top with a think layer of Mod Podge when dry.
-

Step Five:
Once completely dry flip your wooden tag over and Mod Podge on your picture. Seal as mentioned above and allow to dry. I did a second coat just around the edges of the wooden tag to prevent images from lifting.

Step Six:
Once everything is totally and completely dry attach key ring. You can end here if you'd like but I wanted to add some leather lace.
(I think that is as embellished as the hubs would allow!)

Adding Leather Lace:
I just cut my lace to the size I wanted and used a needle to thread through one side. Tie a knot at the end of your thread, leaving a long tail past the knot and pull through.
Wrap your thread around and around and around! Tie a knot with the thread you're holding and the tail left behind the 1st knot buried under the wrapped thread.
Trim the tails and wipe a little bit of Mod Podge over the knot are to help secure

You're Done and now have a super cute Father's Day Key Chain!

If you make one please send me a picture to add to the Aly&Ash Facebook group!
alyashcreations@gmail.com

Make sure to check out Yesterday's Father's Day Gift Idea and come back tomorrow for another one! Whew! Who's idea was this anyway...

And I'll be linking up as always with {These Great Blogs} including The Boardwalk Bragfest!

Thursday, May 20, 2010

Wipe Covers & Cards - Bestie Trip Crafts

Bestie Trip Craft Nights
 
So my bestie Claire and I spent the weekend in Great Falls, Montana with our kiddos and what are girls to do after the kids are in bed...why craft of course!
Notice the staple to any good craft night...Wheat Thins!
Ash decided he should be a "helper" and got to stay up a little later!
So we planned ahead and brought supplies for Wipe Case Covers and Cards. Claire is a card making pro and meets with a card making/stamping group once a month. I am the lucky recipient of these cards quite often and was excited to use her stuff and a make a few for some upcoming birthdays!
Then we used {this tutorial} from {This and That} to cover wipe cases.
Here are some pics of our finished products!
 1. My B-day card  2. Claire's Cute Thank You Card 3. Left: My Birthday Card Right: Claire's B-day Card (Not quite finished by I insisted on a picture!)  4. Wipe Cases Left: Mine Right: Claire's

Saturday, May 15, 2010

See It Again Saturday: Mod Podge Tin Purse

If you missed yesterday's field trip with Mod Podge Rocks, here is what we did:

 
Mod Podge Tin Purse

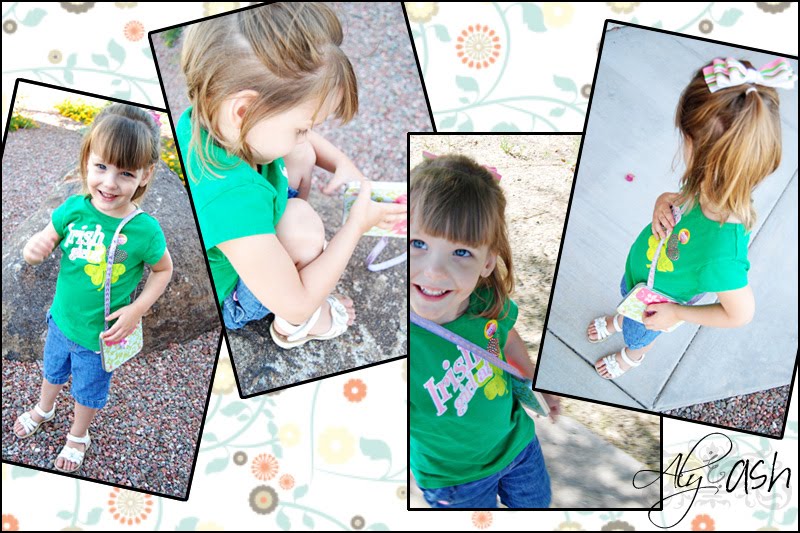
So a while back I had made a {Mod Podge Star Tin} for my niece Aly to store her bows in...well forget the bows, she was in love with the tin and carries it everywhere. It hardly fits in her backpack yet it often travels with her to school! That gave me the idea to make her something similar...and MUCH smaller! I have these CD tins for my photography business {DoChara Photography} and thought..."Hey! I wonder if I could turn one into a purse for her!" Here is what I did:
Step One:
To keep the tin together but still open all the way I used Mod Podge to attach a wide ribbon to the back side of the tin. 

Step Two:
While closed, wrap the ribbon around at secure to the front. I was impatient so I sped up the drying phase with a blow dryer on the cool setting, rubbing out the bubbles as it dried. Trim off the excess ribbon.

Step Three:
Trace, cut out and Mod Podge some scrapbook paper to the front and back of the tin covering the ribbon. I used Sparkle Mod Podge on the top coat to make it extra girlie!

Step Four:
Once the outside is completely dry. Open and lay flat. Cut the desired length of ribbon for the strap and use hot glue to secure to the inside. When attaching, glue your ribbon right side down so it will lay right side up when worn.

Step Five:
Trace, Cut and Mod Podge coordinating paper to the inside covering your ribbon.

Step Six:
Embellish the front and you're done!

Aly was so excited about her new purse!