Good Friday to you all!! I'm so excited to be guest posting today at Aly &Ash! Isn't Jax amazing!! I'm lucky b/c we're not only friends but cousins as well:) I'm constantly anticipating her latest projects, in fact, make sure you hop on over to my blog to see what she's been up to lately:)
So just a tiny little intro about me... I'm Staci. An insanely busy mom of three, a wife of 6 years, and pretty new to quilting and sewing. In fact, I made my very first quilt just over a year ago, but I've been soooo hooked ever since!! I LOVE anything handmade or created. It just makes me feel empowered to know that I can do it! We ALL can do it!! So I'm very honored that Jax was interested in my work and actually asked me to share a tutorial with all of you. I hope you enjoy!!
Taggie Quilt Tutorial
What exactly is a taggie quilt you may be asking... It's a smaller version of a blanket that you tuck around your baby in a stroller or a carseat to keep them warm. The ribbon loops can be used to hook on toys or binkies, or some babies just like the texture of tags so it can be used as a texture thing.
However you use it, they are practical and pretty cute. You can be as creative as you want.
First, take any scraps from coordinating fabric, (or random scraps too) and piece them together to form a mini quilt. You'll want to start with a square or rectangle no smaller than 20 inches. This one is about 21 X 21 inches.
Next cut your batting to be the same size as the top and line up as close to exact as you can. You'll need to choose 5 to 6 pieces of ribbon to match the colors in your taggie. Cut 4 strips of each ribbon at 6 inches long. So you'll have 20 or 24 strips total. For this one I chose 6.
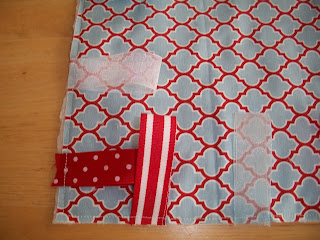
You'll next pin your 6 ribbons in a loop with the loop pointing toward the center of the taggie. Pin them to the top and the batting behind.
Next, sew a very small seam (no more than 1/4 inch) around all sides to hold your ribbon down in place.
For the next step, you'll need some minkie, chenille, or other soft fabric for your backing. Cut it to the same size as your front piece. Pin right sides together.
Sew another small seam (no more than 1/4 inch) around the sides of the taggie leaving about 3 or 4 inches open at one corner.
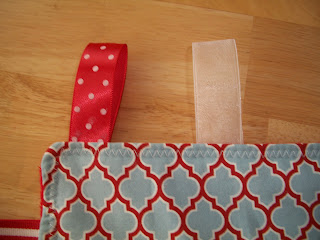
Pull your taggie from the inside out so that all the ribbons are poking out, and smooth out all corners and seams. You'll then need to close your opening, sewing as close to the edge of the taggie as you can.
Next, sew a decorative stitch around all sides of the taggie.
You're all done!
Fun quilt print on one side, snuggly minkie on the other! Enjoy!!!
If you have any questions, let me know by comment or email.
Here are a few examples of some other taggies I've made using scraps of fabrics from quilts and blankets I have made.
Thank you for stopping by today:) Don't forget to come visit, Keeping up with the Johnsons!!
![]()
skip to main |
skip to sidebar
Followers
Categories
Crafts
Tutorials
Random Fun Stuff
DoChara Photography
Wordless Wednesdays
Girls
Field Trip Fridays
Boys
Features
Mod Podge
C.C.L.N.
Giveaways
Sewing
Headbands
Jacquilyn Avery Photography
Recipes
T-Shirts
Weekly Menu
Chic Mommy
Appliques
Bachelorette
Bows
Cards
Freezer Paper Stencils
Photo Contests
Father's Day
Freebies
Rice Krispies
Arizona Bloggers Tour de Thrift
Templates
Vinyl
Baby Boy #2 Nursery
Bleach
Digital Cards
Jewelry
WWIW
"The Machine"
Bachelor Backtalk
Link Parties
Relief Society
Reviews
sponsors
365Project
Photoshop
Reader Shout Outs
Valentine's Day
Vinyl Bibs
b
Blog Archive
-
▼
2010
(201)
-
▼
April
(33)
- Field Trip Friday with The Country Chic Cottage
- "School of Rock" Template
- Tutorial Tuesday: Ribbon Rosette Earrings
- Honorable Mention!
- Crafty Crafty Ladies Night: Mod Podge May & Link P...
- AND THE WINNER IS...
- It's Official! I've Hit 100!!
- Field Trip Friday w/ Craft Envy
- Introducing the Aly in Aly&Ash
- Field Trip Starts Early This Week!
- Tutorial Tuesday: Rock Star Tee & Template
- Home Stretch to 100 Super Box Giveaway!
- Bandana Bib from Wallflower Grown Wild
- I {Heart} Faces Photography Contest: Week 16
- You Made It: Reader Shout Out!
- See It Again Saturday
- Feature Friday - Barn Designs for Baby, Home & Giving
- Where's the Gym?
- Wordless Wednesday
- Tutorial Tuesday, "The Machine" Chronicals & Girly...
- Deco Rock Necklace
- Six Super Sweet Shirts Sister Sent...Say That 3 Ti...
- See It Again Saturday
- Field Trip Friday with One Crafty Mommy!
- Wordless Wednesday
- I've died and gone to heaven!
- Tutorial Tuesday: Girly Girl Bows
- Shirts, Shirts and More Shirts!
- DoChara Photography: Ezra McCoy {Newborn}
- See it Again Saturday - Monogram Bow Holder
- Field Trip Friday with Staci from Keeping Up With ...
- Itsy Bitsy Spider Shirt
- Two Weeks in a Row from One Crafty Mommy & Treasur...
-
▼
April
(33)
Powered by Blogger.
Copyright © 2011 Jacquilyn Avery. | Template created by ThemePix & PBTemplates, customized by Denise Riley.


11 want.love.need.comments:
Thanks so much Cous! I'm so excited to try these once I learn how to use "The Machine" Thanks so mcuh!
Visiting from NFF. Happy Friday
Courtney@ frog2fab.blogspot.com
Your quilts are so cute! Great tutorial.
Very pretty! Great job.
Thanks for joining Get Your Craft on Thursday. Please join me next week for another wonderful party!!
Please stop by next week I am having guest over each day and I would love for you to tell them HI!
Very cute and easy! I'm a new Saturday Follower! Visit me at http://www.rockindeals4you.com/?p=1239 and sign up for my newest giveaway!
This is a great tutorial, Stac! I have a few gals in the ward having babies soon, I'll have to try this as a baby gift.
I have been wondering how to make these! I love the fabric you used! Thanks so much for posting on Favorite Things Friday!
Wow! These are so cute! Thanks for linking up to this week's Super Crafty Saturday!
Those quilts are just beautiful!!!
Thanks for linking up to the Weekend Wrap Up Party!
I hope you will link up and show us more of your projects!
XOXO
Jen
I've been enjoying watching tutorials of different things going on the internet today and this one is another wonderful creation.
Sales Incentive Programs
A wonderful idea to recycle old and unused textile at home. An option to on how to start a business on your own but of course with the help of someone when it grows.
Post a Comment